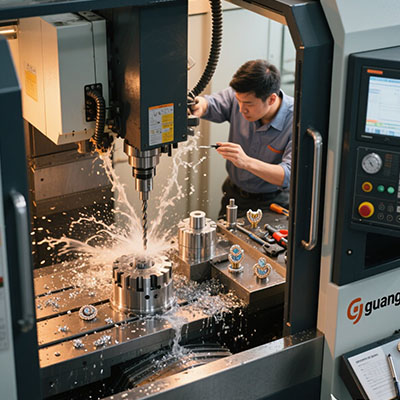
Aerospace work punishes weak frames. Titanium and stainless alloys push back hard. A light frame flexes, chatters, and drifts as it warms. The spindle gets blamed. The tool gets blamed. The frame was the problem all along. This guide explains how to evaluate a 3 axis CNC frame for aerospace kits before money changes hands.
Why Aerospace Still Runs on Three Axes
Not every aerospace part needs five axes. Mounting plates, brackets, shims, and access covers usually carry features on a single face. A rigid three-axis machine cuts those parts efficiently, with simpler programming and faster operator training [citation:6].
The frame advantage is real. A three-axis structure is easier to stiffen. The spindle stays perpendicular. Deflection becomes predictable. Those traits matter when tolerances sit near ±0.001 inch and scrap costs more than the machine payment.
However, the aerospace label on a kit means nothing without frame data. A welded aluminum gantry with thin walls will ring under load. A cast iron or polymer-filled frame dampens vibration and holds geometry over years [citation:2]. That difference separates a production asset from an expensive hobby.
Project A vs. Project B: Two Aerospace Frame Decisions
Two shops bought three-axis kits for aerospace work. One prioritized price. The other prioritized frame mass and damping. The inspection results told the story.
| Factor | Project A: Light Aluminum Frame | Project B: Rigid Damped Frame |
|---|---|---|
| Frame Construction | Welded 6061 extrusion, thin wall | Cast iron base, polymer-filled column |
| Kit Price | $7,200 | $14,800 |
| Spindle | 1.5 kW air-cooled | 2.2 kW water-cooled, continuous |
| Test Cut: Aluminum Bracket | ±0.03 mm, visible chatter | ±0.01 mm, clean finish |
| Thermal Drift (4 hours) | 0.04 mm on Z | 0.008 mm on Z |
| Aerospace Parts Accepted | Prototypes only | Production brackets |
| Hidden Cost (6 months) | $2,400 (fixture rework, scrap) | $300 (coolant, filters) |
Project A saved $7,600 at purchase. Then lost aerospace work because the frame could not hold tolerance through a warm-up cycle. The kit looked capable on paper. The frame said otherwise.
Step-by-Step: Evaluating a 3-Axis Aerospace Frame Kit
Our team reviewed an aerospace supplier’s frame choice in 2025. The machine passed a cold alignment check. Then we ran a two-hour cutting cycle on stainless. Z-axis drift reached 0.035 mm. The frame had no thermal compensation and thin section walls. The supplier returned the kit. Here is the sequence that caught the problem.
Step 1: Ask for frame mass and wall thickness
Mass dampens vibration. Thin walls ring. A production-oriented frame should carry substantial weight relative to its envelope. Heavy-duty frames often run 1,500 to 5,000 pounds depending on size [citation:4]. A 40 kg aluminum kit cannot fake that stability.
Step 2: Confirm the damping method
Cast iron dampens naturally. Welded steel needs stress relieving. Polymer concrete filling adds damping to hollow sections [citation:2]. Ask the seller what damping method the frame uses. If the answer is “aluminum extrusion,” understand the limits before buying.
Step 3: Run a thermal drift test
Cold accuracy means little. Run the spindle at production load for two to four hours. Measure the same feature before and after. Aerospace tolerances often sit near ±0.001 inch [citation:6]. A frame that drifts 0.03 mm while warming will fail those callouts.
Step 4: Cut your hardest alloy, not aluminum
Demand a test cut on titanium or stainless if that is your production material. Watch the spindle load. Listen for chatter. Measure flatness afterward. A frame that cuts aluminum cleanly can still flex under stainless cutting forces [citation:6].
Step 5: Inspect the guideway and screw mounting
Rigid frames need rigid mounting surfaces. Check that linear rails sit on machined pads, not raw extrusion. Confirm ballscrew bearing blocks are solidly anchored. A stiff frame with loose rail mounts defeats the purpose. Vibration starts at the weakest joint.
Step 6: Verify spindle taper and cooling
Aerospace alloys demand rigidity at the tool tip. A larger taper handles radial load better. Water-cooled spindles hold torque through long cycles, while air-cooled units lose torque as the housing heats [citation:2]. Match the spindle to the alloy, not the budget.
⚠ Attention: Three Frame Kit Traps
⚠ Attention: “Aerospace-grade aluminum” is a marketing phrase, not a specification. 6061 extrusion is common and useful. It is not the same as a cast iron or polymer-filled frame for vibration damping. Ask for mass, wall thickness, and damping data. The word “aerospace” on a listing proves nothing.
⚠ Attention: A stiff frame with a weak foundation moves anyway. Heavy frames need proper mounting. Concrete foundations should be significantly heavier than the machine. Inadequate anchoring causes distortion and permanent accuracy loss [citation:4]. Budget for proper installation, not just the kit.
⚠ Attention: Thermal drift hides in short demos. A ten-minute test cut will not reveal frame expansion. Run the machine for hours before judging. Aerospace buyers who skip this step discover drift after the first production lot fails inspection.
Real Data: What Frame Rigidity Delivers
Frame strength determines a large share of machine capability. Industry analysis attributes roughly 65% of capability to frame construction, citing the 2024 Manufacturing Engineering Report [citation:4]. Spindle and control choices matter. The frame sets the ceiling.
A separate case documented a 40% productivity gain after reinforcing frames in continuous production [citation:4]. The mechanism is simple: less vibration means faster feeds, better finish, and fewer rework cycles. A rigid 3 axis CNC frame pays back through throughput, not just accuracy.
For aerospace work, the margin for error is thin. A frame that holds ±0.01 mm on a bracket is useful. A frame that drifts past tolerance is scrap. The difference lives in mass, damping, and thermal behavior.
Answering the Questions Buyers Actually Search
Q: What frame material is best for a 3 axis CNC aerospace kit?
Cast iron and polymer-filled frames offer the best vibration damping for aerospace alloys. Welded steel works when properly stress-relieved. Aluminum extrusion is lighter and cheaper but rings under load. Match the frame to the alloy and tolerance, not the price tag.
Q: How much does a rigid 3 axis CNC frame kit cost for aerospace work?
Production-capable kits with cast iron or damped frames typically start higher than hobby-grade aluminum kits. Expect to pay a premium for mass, water-cooled spindles, and thermal management. The extra cost buys acceptance rates on tight-tolerance parts.
Q: Can a three-axis kit hold aerospace tolerances?
Yes, if the frame is rigid and thermally stable. Many aerospace brackets and plates have single-face features that suit three axes. The risk is not axis count. The risk is a frame that flexes or drifts under cutting load.
Q: How do I test frame rigidity before buying?
Demand a test cut on your hardest alloy. Run it for hours, not minutes. Measure the same feature before and after warm-up. Check surface finish and flatness. A seller who cannot provide this test is asking you to gamble.
Q: What is the biggest mistake aerospace buyers make with frame kits?
Trusting the word “aerospace” on a listing. Inspect mass, damping method, guideway mounting, and thermal behavior. A light frame with a good spindle still cuts poorly. The frame is the foundation, and foundations do not lie.
The Bottom Line on a Pro Mill Frame Kit
A 3 axis CNC frame for aerospace work is not a place to save money. The frame sets rigidity, damping, and thermal stability. Those traits determine whether the machine cuts brackets or scrap.
Ask for mass data. Run a thermal test. Cut your hardest alloy. Walk away from any seller who answers frame questions with adjectives instead of numbers. The right frame costs more upfront and pays back in accepted parts.
Final Checklist: Aerospace Frame Kit Verification
☐ Frame mass and wall thickness confirmed — numbers, not adjectives
☐ Damping method identified — cast iron, polymer fill, or stress-relieved weld
☐ Guideway mounting surfaces machined — rails sit on pads, not raw extrusion
☐ Ballscrew bearing blocks solidly anchored — no flex at thrust ends
☐ Thermal drift test completed — 2+ hours under load, measured before/after
☐ Test cut performed on production alloy — titanium or stainless if applicable
☐ Spindle taper and cooling verified — water-cooled for sustained alloy cutting
☐ Foundation and anchoring plan reviewed — concrete mass adequate for frame weight
☐ Total installed cost calculated — kit, rigging, foundation, tooling, coolant
☐ Seller provided measurement data in writing — not verbal assurances